Author: (c)2002 Tom
This stránka (text původního článku psaného Tomášem Kudrnou, popř. překlad cizojazyčného originálu provedený Tomášem Kudrnou) je autorským dílem a její kopírování, s výjimkou kopírování pro osobní potřebu jednotlivců, je bez předchozího písemného souhlasu autora zakázáno. Toto NENÍ svolení s kopírováním na "osobní" nebo soukromé stránky.
This page (text of original article or translation of English original prepared for tom-bdsm.cz) is copyrighted, and must not be copied without my prior permission, with the only exception of copying for private use. This does not include "private" or personal sites, i.e. you MAY NOT copy the articles and republish it.
This page copyright (c)2002 by Tom, author of this site (back to index) Please feel free to link to this page, but I prefer if you link to the main page of the web.
Main page of this web: www.tom-bdsm.cz. Please come back again! Bookmark this page (Ctrl+D in IE)
Contents:
Introduction
How to manufacture a sulky
Practical experience with riding
A note from the future (16.05.2002) - after 18 months from publishing the most recent version of an updated instruction how to build a sulky (the original instruction was twoyears old), I have rebuilt the sulky and performed a complete overhaul - the description ofthe process is at: Overhaul of old sulky. I am translating both documentsfrom Czech to English (along with a few other documents concerning ponyplay "how to's") because they are among the most popular on my site. The other article includes a section describing the "theory" of sulky riding, with description of the commandswe use in our ponyplay training and scenes. (As far as I know, the "real horse" commands needto be modified, and each driver/pony pair has their own set of commands they are comfortablewith; in the Czech Republic, people are asking me over and over for the same - I believe that my description of the commands we use will help/influence everyone seriously interestedin ponyplay. Example: just three years ago, I invented Czech term for "safeword" in one of myfirst translations; corresponding Czech term did not exist before and now everyone is using it...
Two more articles covering the ponyplay theory: pony dressage and pony+sulky
Yet another note from the future - today (24.05.2002), I have completed a similar instruction how to build a cross-country sulky.
(1999) Warm spring invites us to start regular horse riding sessions. Speaking of BDSM, ponyplay, and us - we are both "switches" - we have a little problem to solve. A horse can carry his Mistress, while the poor little subbie cannot carry her Master. Solution? Simple - let's build a light cart - a sulky.
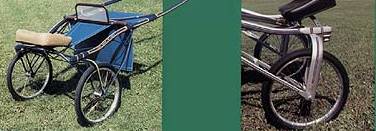
I had a few targets on my mind when designing my sulky. It had to be strong, easy to transport inthe boot of ourcar (although we did not own a car at that time), it had to be rigid (to be used at bumpy cart tracks) and it should looknice. All these targets can be met if you take inspirationfrom real trot sulkies. The picture is taken from a web site of a "real" sulky manufacturer - a lighter desing is on the left, a more robuston the right. In both cases, the load bearing structure consists of horizontal shafts, vertical forks, cross bars and a seat. The wheels are way stronger than ordinary bicycle ones; scooter or light bike wheels could be used (there are special light trailer wheels sold in England, which are almost ideal, but they have no equivalent in the Czech Republic I know of).
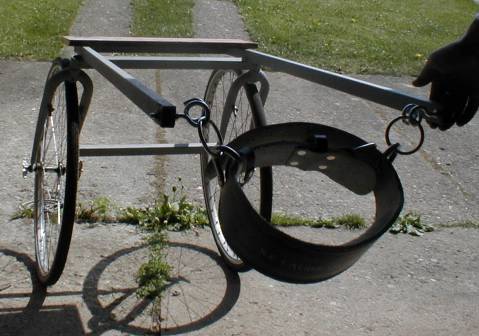
For human ponyplay, the sulky can be much lighter and simpler - but there is one very important issue - the center of gravity (sulky + rider) must be as low as possible - otherwise, the sulkyshafts pull up or down when riding uphill or downhill - this also changes the inclination of the driver's body and thus also his center of gravity. A real horse weights some 400 kg,so the driver's weight does not matter much, but the ponygirl has only 50-60 kg and could be easily lifted off the ground by a 100 kg driver slumping backwards in his seat. For that reason, some BDSMers built sulkies which have the seat at the wheel axes level - see this picture.
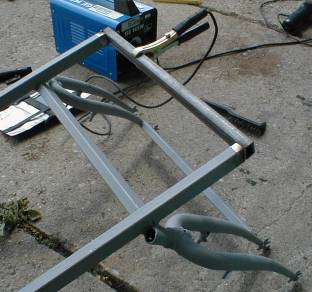
Building the sulky - lessons learned.
Afraid of hurting my pony when my inertia pulls the shafts up or down (it really is unpleasant for the pony, I can tell you), the first version of my sulky had a cloth seat. This "suspension" did not help much. Very soon, I have rebuilt it to the first design, i.e. the seat is high above the wheel axes. Reason: the cloth seat was uncomfortable, and more importantly, one sat low and did not see well where the pony + sulky combination was going to.
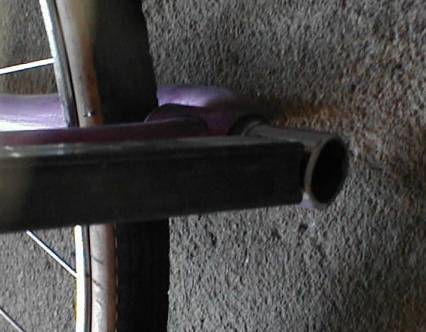
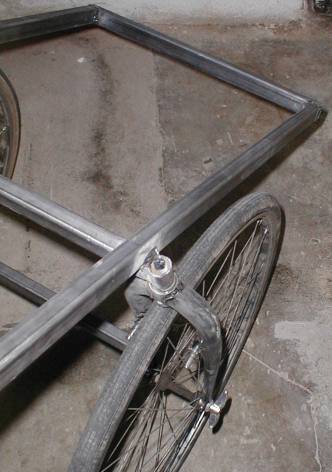
I have used ordinary bicycle wheels on 28 inch steel rims. If you are going to build a sulky, you do not have to buy two front or two rear wheels - you can bend one fork a little, so that the rear wheel with longer axle fits in the front fork (you have to remove the pinion, so that the rear and front wheel have almost the same axle length = distance between the nuts which hold the axle in the fork). The rest of the structure is welded from 20x30x2 mm steel box profiles. Practical test showed that 15x30x2 profiles would do, but I would not recommend thinner profiles; the shafts are 145 cm long from the rear edge of the (cloth) seat up to the front endof the shaft; 15x30x2 profile starts to bend slightly when subject to strong force. The deformation, however, is not permanent. 5 meters of 20x30x2 mm profile weights only 8 kg, which means the sulky will be light. Original shafts were 145 cm long, after the cloth seat was replacedwith wooden one above the wheels, I cut the shafts to 110 cm. This means that the pony's hoovesare almost striking the lower cross bar when trotting; but this is EXACTLY what real horses doat the races - the driver sits above the location where the rear legs of the horse are moving back and forth. The forks connected by a 50 cm long cross bar (this dimension also relates to the distance between the flanks of the pony, i.e. the pony, the harness and the links between theharness and the shafts must fit into that width. Adjust this dimension according to yourpony's build. The driver must fit onto the seat as well, and it has the same width too :-)
The wheels are held by forks, which can be welded of steel, but I think it is better togo to a bike repair shop and get two used slightly bent forks. Original forks are nicer, lighter and stronger. They also include pins for installation of brakes, which I do not considernecessary, but sometimes maybe...
The forks connect to the middle cross bar (the front edge of the wooden seat in the first (later) design, or the middle front bar abovethe driver's knees in the second design with cloth design). There is 90 degrees angle between the cross bar and the forks. Professional sulkies have the forks slightly inclined to the sides, i.e.the upper edges of the wheels are closer to each other than the lower edges. This increases the stability of the profesional sulkies when turning, but ordinary bicycle wheels are too weak for this and are bending when you drive. I would therefore recommend exactly 90 degrees between the cross bar and the forks, i.e. the forks should be exactly parallel - I have inclined them a little and tested that, and the wheels suffer. Sadly, I cannot change the desing now, because the welds reduce the strength of neighboring metal and rewelding is not a good idea.
It is necessary to connect the forks using another, lower cross bar, which serves only as a reinforcement in the first design (and the driver can rest his feet on the bar as well), and as the front edge of the cloth seat in the second design. Then weld the frame to the forks connected with the cross bars. I.e. connect the shafts with a third cross bar, which makes the rear end of the cloth seat (this part was cut off later when changing to a wooden seat). Then weld this frame (open at the front side) to the forks. The forksare inclined to the back. There is about 100 degrees between the frame and the forks. This means that the forks will point straight down when the shafts are lifted slightly at the front end. This is necessary because the pony harness sits at the pony's flanks; this means the front ends of the shafts are about 90 cm above the ground, while the seat is at the top of the wheels,i.e. 75 cm above the ground - this means some inclination is necessary.
Originally, I used the second design, i.e. I had to stretch a length of cloth between the upper and rear cross bar. I used a 45 cm wide and 100 cm long cloth (aerial distance of the cross bars is 60 cm, but you need some extra length of the cloth for making loops at both cross bars and for sewing).
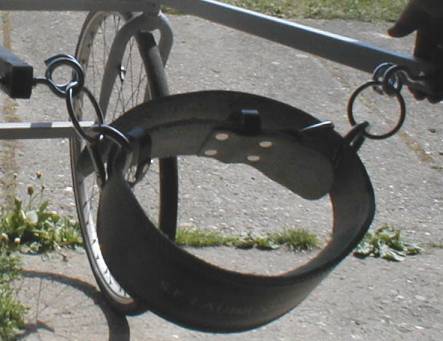
Practical tests revealed that the center of gravity is too far to the rear, i.e. the shafts pull upwards - the ride is unpleasant for both the driver and the pony. It could be moved forward by stretching the driver's feet far to the front, resting them on the shafts, just like at real horse races, but the resulting sitting position was too awkvard for me. Therefore I cut the shafts and welded a new cross bar ca 20 cm behind the middle one - this formed the rear end of the wooden seat. The seat consists of a wooden plank, with dia. 8 mm holes and is screwed not to the cross bars, but to the rear end of the shafts (so that you do not sit on the screw heads). A note from the future - this plank could and DID break the night before we drove for PetWeek in Denmark. I made a substitute from locally available plank and it works ever since. The front ends of the shafts are drilled as well and round hooks are set there, which cannot harm the pony. Originally, the hooks were connected directly to D-rings on the harness, but the connection was too snug, and so I inserted a metal ring made of dia. 6 mm steel rod between the harness and the shaft. There is ca. 2 cm gap between the hook and the pony flank - the smaller, the better. The harness is not closed around the shoulders, as on the real horse, but around the waist - sometimes you have to make compromises. We use weight lifters' belt. You can get it cheaply and it is very sturdy. You can also use it to suspend your partner abovethe ground. It does not slip, and being made of leather, it also smells nice...
What should I have done otherwise, what of the information you can read on the internet is true, and what is bullshit...
I have build the sulky using the information from numerous articles I'd read on the internet, and in various e-mail lists. Similarly to other areas of BDSM, lots of the stuff you read or hear is complete bullshit. Actual experience with the sulky differs from what various people told me with straight face.
I would definitely get more robust wheels; the wheels we use are still OK, but they suffer. We cannot drive over dirt tracks safely (well, our first ride was over coarse gravel, and maybe after we master the art, we could return to the dirt track, but right now, our training takes place on asphalt surfaces only).
As I mentioned above, the sulky with cloth seat close to the wheel axes could mean lower centre of gravity, but the ride is unpleasant for both the pony and the driver. I have therefore modified the construction, placing the seat exactly above the wheel axes (when the forks are vertical and the shafts are inclined slightly upwards.The seat is not covered with leather, but it does not matter when riding on asphalt surfaces.
I did not consult the harness with anyone and I also found no reasonable description anywhere (in 1999; nowadays harnessess are easy to find in web shops). This might be the reason why the harness (horse-collar) is the least problematic part of the whole system. I did not see our harness attachment used anywhere else - we use steel snap hooks through which the harness is threaded. The snap hooks are also attached to steel rings which can be threaded through the hooks connected to the ends of the shafts. This attachment resembles the solution used on real carriages, it is simple and easy to disconnect, and at the same time rock solid, We did not encounter any problems so far, except for the snugness - the issue was solved by insertion of another pair of steel rings.
Conclusion: the sulky works well, the ride is pleasant; if you are into ponyplay and you have enough room to store the sulky in, just go ahead and build it. It is not too expensive and there is big difference between SM scenes in your bedroom or dungeon and outdoor ponyplay - you are surrounded by the nature, you can go virtually anywhere...
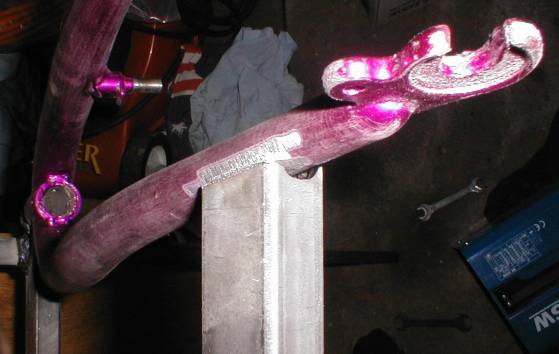
Note from the future,, June 2001. The hooks turned inwards from the ends of the shaftsare not the best option; heavier (well, poor Americans have to use "politically correct" terms horizontally challenged or person of substance), read fat :-) horses can be chafed. I have removed the hooks and welded small metal eyelets onto the top surface of the shafts.
To return back to the page you came from (e.g. a section of this web, list of articles, active picture map...) - alt+left arrow in IE, or mouse click on "Back" arrow in your browser's address bar.